Launching a WordPress Site on AWS Free Tier
In this post we’ll explore how to host your WordPress site on AWS for free for a year.
This method is only suitable for low traffic sites as the free tier allows to use limited resources only.
This won’t be exactly free as a Route 53 hosted zone costs 50 cents per month, but a $6/year is probably still the cheapest hosting solution you’ll find if you’re up to investing about 2 hours of your time.
This took me a lot longer to figure out so I’m sharing it to save you some time.
Prerequisites #
Only an email address and a valid credit card. AWS needs your credit card for billing purposes, in case you use a resource that is chargeable.
Basic familiarity with the command line.
What we’ll build #
An AWS CloudFormation template to create the minimum resources required to run a WordPress site.
I’ll show you how to set up an Apache web server running on an EC2 instance on Ubuntu.
We’ll add ssl certificates to the site to use a secure https:// protocol, free with let’s encrypt.
We’ll add a domain name using Route 53.
And finally we’ll set up our WordPress site.
Create the Infrastructure #
A WordPress site basically needs 2 things:
- A web server to serve site files with PHP installed
- A MySQL database.
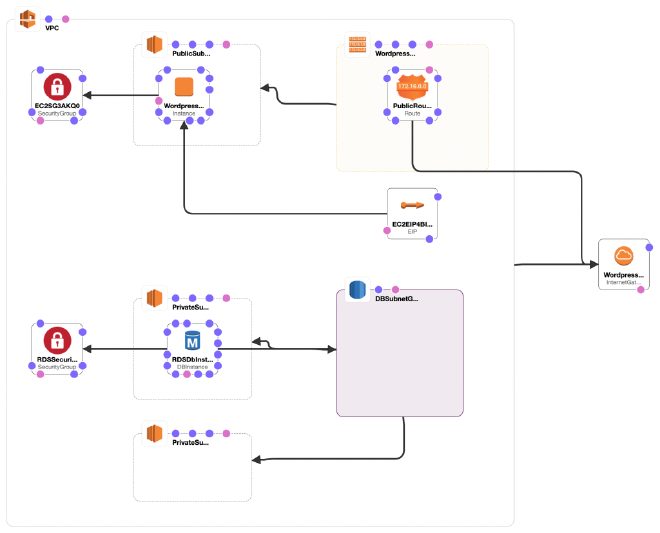
Our CloudFormation template will create the following resources for us:
- VPC (with a route and a route table)
- 2 subnets in the VPC, one private with the RDS MySQL database instance and a public with the EC2 instance that will serve the website.
- Security groups to control / allow specific traffic coming in and going out from our instances
- An elastic IP associated with the EC2 webserver
- Internet Gateway to allow for internet access.
- RDS MySql Database instance
If you’re not sure what these components are and what they do, I’ll briefly introduce them, and you can read more on them in the related AWS docs.
CloudFormation Template

A cloud formation template is a set of instructions for AWS CloudFormation to create a stack, a stack is a collection of resources. And by collection resources – in our case – I mean the infrastructure required to run our WordPress site.
The template below is a blueprint for the stack and describes each resource.
Copy the template below and upload it to AWS CloudFormation like this:
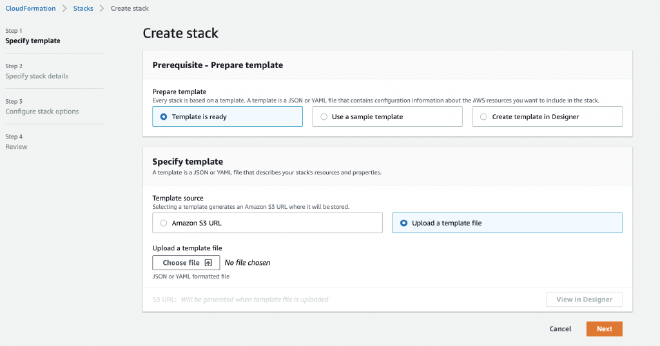
The template is in yaml format so please keep the indentation as is.
AWSTemplateFormatVersion: 2010-09-09
Mappings:
  Network:
    wordpressSite:
      vpcCirdBlock: 10.0.0.0/16
      publicSubnet1: 10.0.0.0/24
      privateSubnet1: 10.0.1.0/24
      privateSubnet2: 10.0.2.0/24
Parameters:
  DBUser:
    NoEcho: 'true'
    Description: The database admin account username
    Type: String
    MinLength: '1'
    MaxLength: '16'
    AllowedPattern: '[a-zA-Z][a-zA-Z0-9]*'
  DBPassword:
    NoEcho: 'true'
    Description: The database admin account password
    Type: String
    MinLength: '8'
    MaxLength: '41'
    AllowedPattern: '[a-zA-Z0-9]*'
  DBName:
    Default: wordpressdb
    Description: The database admin account password
    Type: String
    MinLength: '1'
    MaxLength: '64'
    AllowedPattern: '[a-zA-Z0-9]*'
  InstanceKeyPairName:
    Description: Instance keypair
    Type: 'AWS::EC2::KeyPair::KeyName'
Resources:
  EC2VPCGN0HO:
    Type: 'AWS::EC2::VPCGatewayAttachment'
    Properties:
      InternetGatewayId: !Ref WordPressIG
      VpcId: !Ref VPC
  WordPressInstance:
    Type: 'AWS::EC2::Instance'
    Properties:
      NetworkInterfaces:
        - AssociatePublicIpAddress: 'true'
          SubnetId: !Ref PublicSubnet1
          GroupSet:
            - !Ref EC2SG3AKQ0
          DeviceIndex: '0'
      InstanceType: t2.micro
      ImageId: ami-006a0174c6c25ac06
      KeyName: !Ref InstanceKeyPairName
      AvailabilityZone: !Select
        - 0
        - !GetAZs ''
      Tags:
        - Key: Name
          Value: WordPressInstance
  EC2SRTA2MFZY:
    Type: 'AWS::EC2::SubnetRouteTableAssociation'
    Properties:
      RouteTableId: !Ref WordPressRT
      SubnetId: !Ref PublicSubnet1
  WordPressRT:
    Type: 'AWS::EC2::RouteTable'
    Properties:
      VpcId: !Ref VPC
  WordPressIG:
    Type: 'AWS::EC2::InternetGateway'
    Properties: {}
  PublicSubnet1:
    Type: 'AWS::EC2::Subnet'
    Properties:
      VpcId: !Ref VPC
      CidrBlock: !FindInMap
        - Network
        - wordpressSite
        - publicSubnet1
      AvailabilityZone: !Select
        - 0
        - !GetAZs ''
  PrivateSubnet1:
    Type: 'AWS::EC2::Subnet'
    Properties:
      VpcId: !Ref VPC
      CidrBlock: !FindInMap
        - Network
        - wordpressSite
        - privateSubnet1
      AvailabilityZone: !Select
        - 0
        - !GetAZs ''
  PrivateSubnet2:
    Type: 'AWS::EC2::Subnet'
    Properties:
      VpcId: !Ref VPC
      CidrBlock: !FindInMap
        - Network
        - wordpressSite
        - privateSubnet2
      AvailabilityZone: !Select
        - 1
        - !GetAZs ''
  DBSubnetGroup:
    Type: 'AWS::RDS::DBSubnetGroup'
    Properties:
      DBSubnetGroupDescription: DatabaseGroup for mysql instance
      SubnetIds:
        - !Ref PrivateSubnet1
        - !Ref PrivateSubnet2
  RDSDbInstance:
    Type: 'AWS::RDS::DBInstance'
    Properties:
      AllocatedStorage: '20'
      AllowMajorVersionUpgrade: 'false'
      AutoMinorVersionUpgrade: 'true'
      BackupRetentionPeriod: '30'
      DBInstanceClass: db.t2.micro
      DBName: !Ref DBName
      DBSubnetGroupName: !Ref DBSubnetGroup
      Engine: mysql
      EngineVersion: 8.0.16
      PreferredBackupWindow: '01:00-03:00'
      PreferredMaintenanceWindow: 'sun:06:00-sun:06:30'
      MasterUsername: !Ref DBUser
      MasterUserPassword: !Ref DBPassword
      PubliclyAccessible: 'false'
      VPCSecurityGroups:
        - !GetAtt
          - RDSSecurityGroup
          - GroupId
  RDSSecurityGroup:
    Type: 'AWS::EC2::SecurityGroup'
    Properties:
      GroupDescription: Enable 3306 access from VPC
      SecurityGroupIngress:
        - IpProtocol: tcp
          FromPort: '3306'
          ToPort: '3306'
          CidrIp: !FindInMap
            - Network
            - wordpressSite
            - publicSubnet1
      VpcId: !Ref VPC
  VPC:
    Type: 'AWS::EC2::VPC'
    Properties:
      CidrBlock: 10.0.0.0/16
  EC2EIP4BI5Q:
    Type: 'AWS::EC2::EIP'
    Properties:
      InstanceId: !Ref WordPressInstance
  WebIngressSG:
    Type: 'AWS::EC2::SecurityGroupIngress'
    Properties:
      GroupId: !Ref EC2SG3AKQ0
      CidrIp: 0.0.0.0/0
      Description: Http Web access
      FromPort: 80
      IpProtocol: tcp
      ToPort: 80
  WebSecureIngressSG:
    Type: 'AWS::EC2::SecurityGroupIngress'
    Properties:
      GroupId: !Ref EC2SG3AKQ0
      CidrIp: 0.0.0.0/0
      Description: Https Web access
      FromPort: 443
      IpProtocol: tcp
      ToPort: 443
  SSHIngressSG:
    Type: 'AWS::EC2::SecurityGroupIngress'
    Properties:
      GroupId: !Ref EC2SG3AKQ0
      CidrIp: 0.0.0.0/0
      Description: SSH access
      FromPort: 22
      IpProtocol: tcp
      ToPort: 22
  EC2SG3AKQ0:
    Type: 'AWS::EC2::SecurityGroup'
    Properties:
      GroupDescription: vpc and instance sg
      VpcId: !Ref VPC
  PublicRoute:
    Type: 'AWS::EC2::Route'
    Properties:
      RouteTableId: !Ref WordPressRT
      DestinationCidrBlock: 0.0.0.0/0
      GatewayId: !Ref WordPressIG
Once uploaded, hit next, and give the stack a name, fill in the database username and password fields, and select a key pair for the EC2 instance. You have to have a key-pair otherwise you won’t be able to connect to the instance later!
If you have a key-pair available select it from the list, if not then create one under EC2 > Network and Security > Key Pairs > Create New, we’ll use this key to ssh into the instance, so download the .pem file and store it somewhere safe, ideally in your .ssh folder (on Mac). We will need this Key later!
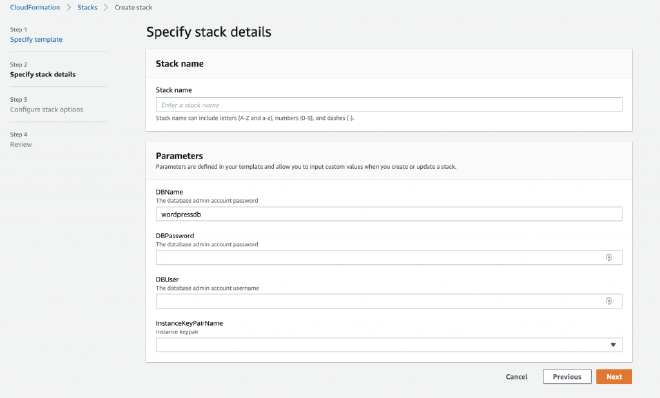
Once done, hit next and then hit next again, and then review the changes and hit Create Stack.
The process can take up to 10-15 mins (most of it is launching the EC2 and RDS instances).
To be in line with best practices, here you can set up an IAM role that CloudFormation can assume so it’ll have only the minimum necessary permissions to carry out the stack creation. Although this is recommended, it’s outside of the scope of this writing.
TL;DR;
VPC

stands for Virtual Private Cloud, it is a bit of a network space that we have complete control over. We can control the whole networking inside the VPC, IP ranges, subnets, route tables, internet gateways.
Subnets


In this case we’ll need two of them, a private and a public. A subnet is a logical subdivision of the VPC.
A private subnet is private because it’s not accessible from outside the VPC, like from the internet. So for example our database instance will sit in this one, to avoid exposing it directly to the internet.
A public subnet is public because it’s available from outside the VPC, in our case it’s reachable from the internet.
If we say our VPC’s CIDR range is 10.0.0.0/16 (which is the maximum address space we can get) – this is just a fancy way of saying that we can allocate a max of 65k of IP addresses.
Then our Public Subnet can be: 10.0.0.0/24
and the Private Subnet can be: 10.0.1.0/24
In case we need more subnets we just increment the second to last number, this way we can have 256 subnets with a range of 256 available IPs in each.
EC2

stands for Elastic Compute Cloud, when configured and launched it’s referred to as an “Instance”. This is our server in the cloud.
With the Free Tier we get 750 hours of free compute time each month for 12 months for a t2 micro instance.
Security Groups
To allow traffic to and from our instances, we can create “allow” rules in the security groups as everything is denied by default.
We’ll allow inbound traffic on the following ports:
- 22 to be able to ssh into our instance while setting up the thing.
- 80 to allow http web traffic to hit our website (until we set up https)
- 443 to allow https secure traffic to hit our site.
With port 80 and 443 you’d allow unrestricted inbound traffic, which is kind of the point to allow everyone to view your site.
With port 22 ideally you’d restrict it to your IP address, or at least the range of your ISP (Internet Service Provider).
Elastic IP
It’s an IP address. If allocated and associated it’s free, if not associated it costs a tiny amount of $.
Why do we need this if the EC2 instance has its own public ip? We don’t necessarily need it but it’s more convenient, because every time an instance is launched, it will have a new, different IP address. This means, everywhere where we refer to this IP would need to be changed, and using an elastic IP can avoid this. For example we’ll point our domain name to the EIP and even we might change the underlying EC2 instance the domain settings remain the same. We’ll only need to re-associate the EIP to the new instance.
Internet Gateway – IGW, Route Table
Our VPC by default is isolated from the outside world. To enable internet access to and from our components inside the VPC we need an IGW.
To make our public subnet really public, we create a route in our route table (RT) that points to the IGW as a target allowing access to the internet for everything that is in the public subnet.
And what will make our private subnet really private is that everything in it will be only accessible only from the VPC, or the public subnet. For this we will not need any specific routing as this is the default behavior.
RDS DB Instance – MySql
This is the second “thing” that a WP site needs. A MySql database to store data, like settings, content, comments etc.
But wait, why can’t I just install the DB engine on the EC2 where the site is served from? You can. But, remember the web server is in a publicly accessible part of your network. And also a standalone installation of mysql or any other db engine is 100% managed by you. So you’ll have to take care of backups (create, store, restore), maintain the db.
And one of the most important bits is if the EC2 instance stops/terminates your db is gone with it.
And again the RDS service is an AWS managed service. All we have to do is select the instance type, give it a name and off we go, the rest is taken care of by AWS.
TL;DR;
Setting up Your Web Server #
Once cloud formation executed without an error, the stack is in COMPLETED state and the EC2 instance as well as the database instance is running it’s time to ssh into our fresh EC2 instance.
You can do so by getting your IP address from here: (EC2 > Instances)
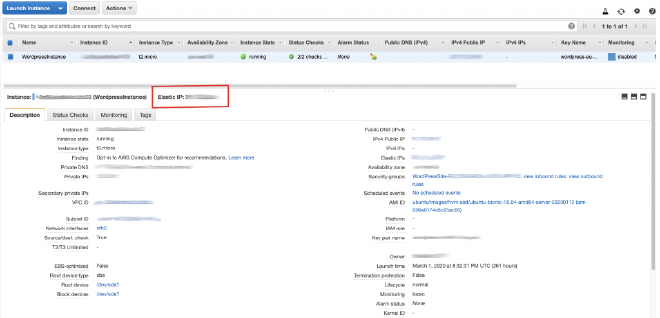
ssh -i "~/.ssh/<your-keypair-name>.pem" ubuntu@<yourElasticIP>
// for eg: ssh -i "~/.ssh/wordpress-eu-west-2-keypair.pem" ubuntu@35.179.37.59
Where ubuntu is the default username in case on an Ubuntu image (ami-006a0174c6c25ac06).
If all went well you should find yourself logged in.
Next we’ll make sure that our web server (ec2 instance) can see the database instance, for this we can use netcat, you can get the endpoint url from RDS > Databases >
nc -vz <rds-db-instance-endpoint> 3306
// nc -vz xxxxxxxx.xxxxxxxx.region-xx.rds.amazonaws.com 3306
It should report “Connection Succeeded”.
Next: finish installing the LAMP stack where L(inux) and M(ySql) is already done, we’ll need A(pache) and P(hp).
First update:
sudo apt update && apt upgrade
then:
sudo apt install apache2 -y
sudo apt install php php-mysql -y
Now, when you type <your_elastic_ip> in the browser, a default Apache page should show up.
Great, our instance is reachable from the internet, and apache is up and running serving the default directory of /var/www/html/.
What’s left?
- Domain name setup
- SSL certs with Letsencrypt
- WordPress setup
Domain names with Route53 #

A custom domain name is a large part of your site’s identity, it tells a lot about your business, it has to be memorable, it’s an important part of your marketing strategy. You definitely don’t want to have it as a bare IP address, as that is what you have when launching an EC2 instance, or a default amazon issued load-balancer dns address, should you use one.
Ideally you’d like something like www.mygreatbusiness.com
From here there are two options available.
- You already own this domain name, from an external domain name provider, like godaddy, 123Reg or any other.
- You don’t have the domain name yet.
Either way it’s easy to get started with Route53. If you don’t have your domain yet, you can buy and register it through Amazon, from Route53 directly.
At this point I assume you have your domain name and you’re ready to connect it to your site.
Go ahead and create a hosted zone in AWS Route 53, type your chosen domain name and click on Create.
This will create the hosted zone, which is basically just a collection of dns records for a specific domain.
Once created you’ll have an NS and SOA record, NS stands for Name Server. If you want to use a domain name registered at an external (non Amazon) dns provider you’ll need all 4 (preferably) name server addresses listed in the NS records. Take note of these and give them to your domain provider so it will know where to forward the request targeting your domain address.
Continue setting up Route53, you’ll need 2 A records. one with www and one without.
Create an A record or Alias record as this will point to another resource. Choose a Simple routing policy and in the name just give your domain, like, mygreatbusiness.com (or just leave this empty because the apex is the default.) and in the Route to section type: www.mygreatbusiness.com, so the address without www will route to the one with www.
Second: create the A record with www and point to your EC2 instances Elastic Ip (EIP).
You’re done. When a visitor types www.mygreatbusiness.com or mygreatbusiness.com it will route to the same place, it’s more convenient to your visitors.
Setting up WordPress #
First SSH into the instance:
ssh -i <path to .pem file> ubuntu@<ec2-public-ip>
# For Example:
ssh -i ~/.ssh/wordpress-eu-west-1.pem ubuntu@35.179.50.34
Before proceeding, get the latest packages and update if you haven’t done it in the previous step:
sudo apt-get update
sudo apt-get upgrade
You might use a variety of wordpress plugins, so might need to install additional php packages
sudo apt install php-curl php-gd php-xml php-mbstring php-xmlrpc php-zip php-soap php-intl
going HTTPS #
Nowadays no proper website should use unencrypted traffic. It’s important to use secure connection.
To achieve this we’ll use letsencrypt with auto-renew certificates.
Let’s Encrypt is a certificate authority that provides free TLS certificates.
Because we are using Apache as our web server on a Ubuntu 18 instance we’ll let Certbot get and install the certificates for us.
sudo add-apt-repository ppa:certbot/certbot
sudo apt install python-certbot-apache
sudo certbot --apache -d <mydomain.com> -d <www.mydomain.com>
sudo certbot renew --dry-run
If you’re using different systems visit https://certbot.eff.org/instructions, select your webserver and platform and follow the instructions to install ssl certificate on your webserver.
When done, restart Apache
sudo systemctl restart apache2
Install WordPress #
First we’ll download WordPress, unzip and update ownership, add correct permission on files and folders and finally we’ll update the wp-config.php file with host url and credential for the database.
To get the latest version of wordpress and extract to the current folder eg: your user home
cd ~
curl -O https://wordpress.org/latest.tar.gz
tar xzvf latest.tar.gz
the above commands will download the latest wordpress and extract to ~/wordpress
Next, create an empty .htaccess file:
touch ~/wordpress/.htaccess
Rename the sample config file, like this:
mv ~/wordpress/wp-config-sample.php ~/wordpress/wp-config.php
Create an upgrade folder to avoid running into permission issues later
mkdir ~/wordpress/wp-content/upgrade
Now update the ownership of the files and directories in the wordpress folder so Apache will be able serve, read and write. www-data is the user Apache uses.
sudo chown -R www-data:www-data ~/wordpress
Copy the prepared wordpress folder to the root folder that Apache serves.
sudo cp -a ~/wordpress/. /var/www/html